Showing posts with label Free Tutorial. Show all posts

Saturday, March 31, 2012

Twitterpated for Men - A Brand New Tutorial


I'm so happy to share with you today a brand-new tutorial that I have designed specifically for the men in our lives! It's been a goal of mine to put together a group of projects that will see us through birthdays, Father's Day, graduations and "I think you are so special" occasions. This is it! The set includes two cards, an easel card, a gift box and a gift card holder.


I've made this group of projects using Twitterpated DSP from Stampin' Up!'s 2012 Occasions Mini Catalog along with Basic Grey, Pear Pizzaz, Baja Breeze, and of course, Whisper White.

The tutorial includes twenty pages of easy-to-follow instructions and a supply list  along with step-by-step pictures for all five projects allowing you to sit back, relax and enjoy being creative!


As an added bonus, I will be recreating and posting these same projects in June, but with a feminine flair for the gals, and again in July featuring Stampin' Up!'s brand new Christmas Designer Series paper.  What this will give you is five projects that you can count on for many occasions. The tutorial, however, will only be available through this page. So, click below, and let's get stampin'!


Download Tutorial Now $3.95


Wednesday, March 21, 2012

Bird Feeder Treat Box - Free Tutorial


Oh my! In the last magazine Stampin' Up! published specifically for their demonstrators (all kinds of perks!) they gave directions for a treat box that I thought was too cute!
However, as often happens, when I get an idea it ends up being quite different from the original and this project was no different. First, I thought I would do the entire box using Window Sheets so you could see all the goodies inside - but I happened to be out and had to place an order for more.... so, while I was waiting I used the very last little bit of Mocha Morning (polka dot) I had left to create this delightful little number. You kind of hold your breath when you use the last of something - ever done that?  
This treat box is filled with chocolate covered coffee beans - yummy!


Here are the directions as I made it:

Cardstock:
Mocha Morning DSP                 122366   (1) 4" x 6-1/2"
                                                            (2) 3-1/2" x 3-1/2"                                            
Pear Pizazz card stock              119795   (1) 3-1/2" x 4-1/2"
Very Vanilla card stock              101650   (1) 2-1/2" x 6"
Early Espresso card stock         119686   (1) 4" x 4"
Window Sheets                         114323   (1) 1-1/8" x 4"

Ink:
Sahara Sand                             105208

Embellishments:
Brads, Brights                             119740  (1)
Chocolate Chip Satin Ribbon        124327  (10")

Tools:
Big Shot! Machine                       113439
Island floral Die                            118871
Scallop Circle #2 Die                   113469
Bird Builder Punch                       117191
Blossom Bouquet Triple Layer
Punch                                         122464
Crop-a-dile                                   108362
3/4" Circle Punch                         119873
Paper Snips                                 103579
Sticky Strip                                  104294
Stampin' Dimensionals                  104430
Glue Dots                                    103683
Bone Folder                                 102300
Stampin' Sponge                          101610


Directions:
1) Score Mocha Morning DSP at 1-1/8", 2-1/4", 3-3/8", 4-1/2" and 5-5/8".
2) Using the 3/4" Circle Punch, punch one hole centered between the 2-1/4" x 3-3/8" score
     lines, with the punch placed as far in as paper will allow. Refer to picture below.

3) Using Snail Adhesive, adhere Window Sheet to back side of 3/4" hole.

4) Create tube by adhering with Sticky Strip along 3/4" side as pictured below.

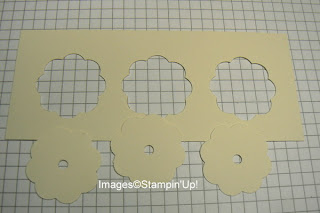
5) Using Mocha Morning DSP (3-1/2" x 3-1/2") cut two flowers using the Big Shot! Machine     
    and the Island Floral Die. With Crop-a-dile, punch 1/4" hole through the center of one flower
    to accomodate ribbon. the other flower is for the bottom and will have a tiny hole in it which
    was created by the die. It shouldn't be a problem - you can always put your "created by"
    sticker over it if you want to hide it. That's what I did :)

6) Using Bone Folder, crease each petal on both flowers so they each form a hexagon.
7) Using the Blossom Bouquet Triple Layer Punch and Very Vanilla card stock, punch out three 
     flowers using the setting that creates a solid flower. Punch 1/4" holes in center of each flower
      using Crop-a-dile.
8) Using Paper Snips, cut each flower to create petals as pictured below. Sponge front and
     back of flowers using Sahara Sand ink and Stampin' Sponge. Use Bone Folder to curve
     petals. Changes the look of them quickly, doesn't it?

9) Using Pear Pizazz card stock and the Bird Builder Punch, punch out three sets of leaves.
     Conserve paper as shown below. Adhere leaves  to top of treat holder with Glue Dots.
 10)Adhere flowers to top of treat box using Glue Dots. Tie ribbon through to create a loop and
     secure with a knot underneath top.

11) Apply Sticky Strip on inside of each petal on both DSP flowers and adhere one to top of
      box - fill box with treats and adhere the final flower to the bottom of box.

12) Using Early Espresso card stock and the Scallop Circle #2 Die cut out one of the large
       scalloped circles. Adhere to bottom of box using Sticky Strip.


Friday, March 9, 2012

Miniature Vintage Envelopes


So here are a few great little envelopes that add a nice little flourish to a project - simply made from the Extra-Large Tag punch!  They took just a minute apiece and just make me happy - I could (and have) made dozens! Wouldn't they be cute on the end of a bookmark?


And a close-up! These are a bit addicting, so be warned - but you can use up all those little scraps you haven't tossed yet. They go great with the Bird Builder punch, as it always helps to have a little bird to deliver a darling little letter!

Supplies:
Very Vanilla card stock     -  101650    2" x 11"
First Edition DSP              -   121878   2" x 11"
Crumb Cake ink                 -  121030
Tiny Tags stamp set           -  118091 w    for "hello" and "crown"
                                                 228592 c
French Foliage stamp set -  120845 w    for Paris postage mark
                                                 121166 c
Extra-Large Tag punch      -   119866
Stampin' Sponges             -   101160

Directions:  
1)  From card stock punch desired number of envelopes using the Extra-large Tag punch.

2)  Score along fold line of "envelope" as shown. 


3) Flip envelope over and cut at 1", measuring from the score line.

4) Sponge edges of envelope with Crumb Cake ink using a Stampin' Sponge.

5)  Apply Sticky Strip under envelope flap and adhere flap in place.


6) Using Crumb Cake ink, stamp "postage mark" onto envelope.
Now - isn't that just the cutest thing you ever did see?

Friday, January 20, 2012

Valentine Lollipops!

Remember all the fun of taking your Valentine's to school? This project is the end result of our daughter's call "Mom, do you have any ideas for something special the girls can take to school on Valentine's Day?"  I LOVE calls like that - the brain goes into over-drive, ready for another new idea!

I created these using the Island Floral Bigz Die. They go together quickly - which is always good when you are mass producing.  I cut out 40 of them, and sent them on to the  "cutest granddaughters in the world" where they will put them together, complete with lollipops and ribbons and present them to their friends on hearts day.  Don't you wish you were in their class?

Supplies:
Pretty in Pink card stock    2-1/2" x 5" per lollipop
Red Glimmer paper #121790  pg 181   1-1/2" square per lollipop
Wild Wasabi 1-1/4" Striped Grosgrain Ribbon #125059
1-1/4" Circle punch # 119861
Cellophane bags 3" x 5" #103104  pg 181
Big Shot Machine
Island Floral Bigz Die
Perfect Polka Dots embossing folder
2-Way Glue pen or Multipupose Liquid Glue   pg 206
Lollipops (not in the SU! catalog :)

Directions:
1) Fold pink card stock in half to create a 2-1/2" square.

2) Using the Island Floral Bigz Die, lay the folded cardstock onto the flower die making sure that the folded edge lays within the cutting border - need a pic on this one, right? Here's the deal - you want the flower to be able to still fold in half after it's cut.  Tough to get a good pic, but I think you'll get the drift.

Here's what it looks like after it's cut:


3) Emboss the flower front only using the Perfect Polka Dot embossing folder. I was able to do three flowers at a time - see pic below.  I lined up the fold of the flower with the edge of the embossing folder so the back of the flower is on the underside and will not be embossed which makes writing the greeting inside just a tad easier!


4) Using the 1-1/4" Circle punch and the Red Glimmer paper cut out flower center. Adhere to flower using Snail Adhesive.

5) Write  or stamp your greeting inside the flower and then place your lollipop through the opening on the folded side of the flower. The folded part of the flower will be at the bottom. You can adhere the flower to the lollilpop with a little Multi-purpose Liquid Glue or the 2-Way Glue Pen. "These adhesives are both temporary when allowed to momentarily dry before adhering"

6) Place in cellophane bag and tie with ribbon - isn't it cute?  Happy Valentine's Day!

Here are the ones ready to be mailed to Kaylee and Hope!
And just in case you are wondering "so how cute are the cutest granddaughters in the world?"  here they are enjoying the beach!  

Monday, August 8, 2011

Vintage Coffee Cup gift card holder & gift tags, too!


Happy Monday afternoon to each of you that follow my blog!

I've been playing around with a coffee cup pattern I originally saw as a video tutorial on Confessions of a Stampin Addict. 

I made mine as a card that opens the traditional way. I now have a stash of them! My favorite is this "vintage" one I created for a special friend of mine who lives miles away. We are long overdue for a coffee chat, friend!! I loved it so much I decided to make some the size of a gift tag.   And I'm still thinking.... how about a coffee cup Christmas tree ornament?  Does your brain ever get like that - it's racing with ideas faster than you can possibly create them? Gotta love it!!  So although this project was not my original idea I will give you the dimensions I used along with a few simple changes I made. 

So how 'bout we share a cup of coffee as we get started. Go on, I'll wait while yours brews!                                                                                                                                                                                                           

Supplies: 
Creative Elements stamp set
Cherry Cobbler, Early Espresso ink   
CherryCobbler, Crumb Cake, Early Espresso and Whisper White card stock  
Crumb Cake seam binding #122332 
Pearls #119247  
Large Oval Scallop Punch #119855  
Scallop Oval  Punch  #119856
Corner Punch #119871   
Crimper #101618  
Perfect Polka Dots embossing folder #117335  
Elegant Lines embossing folder #119277 
Stampin' Dimensionals

For gift card holder:
Crumb Cake c/s - Cut one piece 8-1/2 x 3-1/4 (you can get 3 from one piece of c/s!)
Fold in half to create a 4-1/4" x 3-1/4" card.
Along what would be the bottom of the card, measure in 1/2" from each side and mark using the scoring tool on your cutter.
Fold card in half and lay along cutter as shown:
Now cut a wedge off each long side, starting at the top folded edge, down to the 1/2" mark as shown above. Repeat on opposite side of card to create a "coffee cup" shape.

Stamp flower from Creative Elements stamp set randomly on "cup" front using Cherry Cobbler ink. 

 Emboss front of card only using the Elegant Lines embossing folder.

From Whisper White c/s, cut a piece 3-1/2" x 1-1/2", fold in half lengthwise and round off both bottom corners with the Corner punch to create the "lid". Run "lid" through the Perfect Polka Dots embossing folder.
Adhere in place over top of card using Sticky Strip (love that stuff!).  

From Cherry Cobbler: Cut one piece 1" x 3-1/2". Run through crimper to create "band". Adhere in place. Trim edges to fit "cup".

Your "cup" should look like this! How'd it go?

Cut 7" of Crumb Cake seam binding. Adhere around band with the cut ends meeting in the center on front of the cup. This way they'll be covered by the embellishment.

Using Early Espresso ink, stamp sentiment on Whisper White c/s and then cut out using large oval punch.
Using Early Espresso card stock, cut out one scalloped oval. Adhere in place at center of band.
Using Stampin' Dimensionals adhere sentiment in place.
Adhere pearls in place.
You're done!  Isn't it cute?  Hope you didn't spill your coffee!!


NOTE: For gift tags begin with a "cup cut 2-3/4" x 3-1/2'. Directions remain the same.